The Hail Mary
LoCARB…what can I say about this project that hasn’t been said already? Ok, so lets just jump right into it then.
Since the last update LoCARB has been repaired – and in a way which is really just a patch job to get the boat seaworthy (depending on who you ask) enough so that it can get back in the water and on its way as soon as possible. The last post covered the magnetic coupling failure, and since I knew I didn’t want to spend the money to have one machined, I decided it was best that LoCARB try to see how far it could get without one. And by that I mean, LoCARB is literally going to go bare naked motor and prop immersed in seawater because why not?
Anyways, here is what I did to repair the motor/prop drive.

Since there wasn’t an off-the-shelf coupling the right size to connect my motor to the propeller shaft, I just printed one. I also wouldn’t need to worry about any parts melting since the entire drive would be submerged in water.

Test Fit

Another view of the coupling

Prop shaft carrier bracket. Not pictured are the covers for the open areas which were installed after the shaft and fasteners had been sealed/epoxied into place

3D printed rear cone ready for fiberglass
Replacing the MPPT solar charge controller
After a week of thruster repairs I was ready to re-launch the boat…or so I thought. Upon more testing I found the solar panel was not charging the batteries. Troubleshooting determined it to be the solar charge controller. Cutting open the pod revealed that 3D printed end caps (despite being quite thick) still allowed water to seep in which then caused the solar charge controller components to corrode. MPPT solar charge controllers for lithium batteries being relatively expensive, I chose to forego the dedicated controller and instead just replaced it with a $12 buck converter.
After some testing, I found that the buck converter was actually more efficient at charging the batteries than the MPPT charge controller and I just set the controller to 16.7v so it wouldn’t over charge my batteries.
This raises the question of whether one really needs to get a fancy pants solar charge controller to charge batteries for vehicles such as these. I found that as the batteries approached full capacity (4.2v), current draw decreased to 0. This makes sense, and as long as the voltage was limited to below the 4.2v per cell or 16.8v (for my 4S10P battery pack), overcharging really shouldn’t be an issue.
Backflow Solar Diode?
Another interesting dilemma I ran into was deciding on whether or not I needed a diode to prevent the solar panel from draining the battery during night time. Initially, I installed a diode inline with the buck converter, but after running it for 3 minutes it became hot to the touch. It also reduced the efficiency of the system quite a bit. After overnight testing however, I realized it’s not an issue to worry about as the voltage drop averaged out to 0.018v/hour when dark (so 0.216v over 12 hours). I kissed the blocking diode goodbye.

Here are my rabbits (Crunchy and Sniffles) troubleshooting the bustimigated solar charging system
Frankenstein boat
Some of you may be asking why I’d just launch LoCARB with a motor directly exposed to salt water as it won’t last very long. The answer is two-fold; I didn’t want to spend any more money, was too lazy to completely overhaul the rear of the motor/pod, and I realized that it would be pretty cool to see how long a brushless motor would last submersed in salt water. Also, I put another motor on the boat. Oh wait…that’s more than two…but yeah, all of those reasons, maybe a few more…I forget.
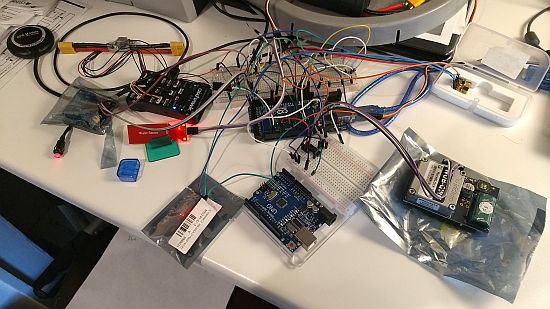
Knowing good and well that the motor was doomed to failure given enough time exposed to the elements, I added a cheap sub-$50 underwater thruster I found on Amazon to be a secondary motor. It was simply a matter of re-jiggering the pre-existing motor relay which is used to power cycle the original motor, splicing into the power wires, connecting a second ESC and RPM sensor to the Arduino Mega, blowing out an interrupt pin on accident (which caused some strange readings with the RPM sensors, but compensated for in software), dialing in thrust and power consumption, and doing some cheap trick programming wizardry. I then had a fully functioning secondary motor to switch to when the first motor eventually failed. Easy as pie!

Here is a picture (test fitting) of how the second thruster will be attached. I am running high current USB cable through 1/4″ drip irrigation tubing to keep it dry. The PVC tube under the solar panel houses the RPM sensor and ESC. I didn’t want those components near my autopilot or Sat modem.
Actually, as I write this I realized that my motor monitoring function for power cycling the motor wasn’t completely re-jiggered to be 100% compatible with switching to the second motor. Oops! Oh well, it shouldn’t be a problem as I can manually control the monitoring and secondary motor functioning via satellite message.
Shoe Goo and its derivatives (Amazing Goop for plumbing etc.)
A note about Shoe Goo. This stuff is great, I used it extensively to seal the through hull fittings of the USB/drip irrigation tubing that ran into the brain box. It worked well despite the drip irrigation tubing being polyethylene plastic. It didn’t easily rub off like 3m 5200 or Loctite Marine Sealant. I had even tried using 3M 4693H meant especially for plastics and found its properties to be less than satisfactory. I wish I used Shoe Goo earlier!
Launch #4
On May 30th, we launched LoCARB for the 4th and HOPEFULLY final time. I feel the project has run its course, and I think Kerry my friend who has so graciously taken me out every launch, thinks it is too.
Here are some pictures of charging the boat before launch, and the boat in the water after we said goodbye.

LoCARB catchin’ some sun

LoCARB catchin’ some waves

A decent picture of the typical profile of the boat in water when motor is not running (because launch routine)

Goodbye boat!
What’s next?
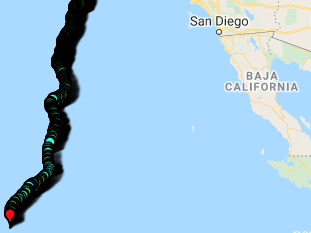
Only time will tell, but the boat is moving decently well enough. Its hitting some wind action (12-16mph) which is pushing it south, but it should let up around 11pm and drop down to 5mph. Lets see how it fares overnight.
Will the motor even last that long?