

Set to launch, then covid happened…
Well, 2020 has been shaping up to be a kick in the pants… In early 2020, the San Francisco Bay Area took proactive measures to slow the spread of the corona-virus. During the months of April to June, orders to stay home and social distance were issued. Parks, beaches, and schools closed, which given the novel spread of the corona-virus was a good idea (but not good for LoCARB development). Since then, I have had some time to work a little on LoCARB, but only in the capacity that did not really involve leaving the house. Now that things are re-opening, I thought I would post an update about what has been happening with LoCARB and its future launch.
So what have you been doing?
During the shelter in place, I pretty much decided to take on other projects, which included refining my skill in CAD design and trying my hand at building construction. As such, I made a Christmas ornament of LoCARB, and built a she-shed in my backyard.
Here is a picture of the ornament:

and some of the shed:


Refining the Magnetic coupling
In my last update on the magnetic coupling, I detailed about how my magnetic coupling failed not because of the design of the components, but because of a materials issue where the PVC cement fumes interacted with the epoxy and caused it to rubberize and fail. The magnets dislodged from the inner magnetic coupling and were flying loose, literally!
Since I needed to dismantle the magnetic coupling for repairs, I also decided to have the waterproof barrier made in a way which was stronger and less likely to fail. My original goal was to machine it out of aluminum, and epoxy it in place. So a craigslist search and $175 later, I had a beautifully machined part which although broke the budget for LoCARB, decreased the chance of almost certain failure from using a questionable 3d printed part in ABS.

Here I am with Gary the machinist!

Notice new 3d printed sleeve around inner magnetic assembly.

The machined waterproof barrier (literally the most professional part of LoCARB).
Excited and with a renewed hope of success, I picked up the coupling and did a few test spins of the inner magnetic portion only to notice that it was not spinning easily. There was no apparent physical interference and it was almost as if there was spin resistance from magnetism or air…An idea struck me with what could be causing it (with much despair I might add), when I recalled a Youtube video of people dropping magnets down copper tubes…I didn’t know what that effect was called but I was confident it was that same dynamic at work here.
A few searches later and my suspicions were confirmed. It was Lenz’s law.
Lenz’s law, named after the physicist Emil Lenz (pronounced /ˈlɛnts/) who formulated it in 1834,[1] states that the direction of the electric current which is induced in a conductor by a changing magnetic field is such that the magnetic field created by the induced current opposes the initial changing magnetic field.
Here is a video which shows the different manifestations of the law at work:
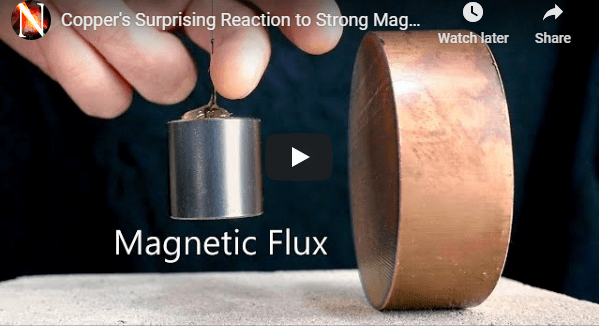
ARGH! This was the second time a materials interaction caused something to fail! I was only solaced with the idea that, Lenz’s law is pretty rad… and that normal people like me would never ever encounter this so I gave myself a pass for not knowing about it earlier. Unfortunately this didn’t help that I just spent a lot of money on a part which would not work, and put me over budget. My next thought was to have the part machined out of a plastic of some sort, which would fix the issue but I knew that would put me WAY over budget. I reached out to Gary again to see how much it would cost to redo the part in PVC type 2 (more impact resistant than type 1), and he unbelievably said $0. So THANK YOU Gary, you really saved me on this one (great people really make the world go ’round don’t they!?).
Here are some pictures of the machining process, but with PVC type 2 vs aluminum:


One thing I’ve learned working with people who have “hand skill” is that you can tell a lot from their workspace. If their work area is organized, clean, and functional, then you have a detail oriented and discerning/skilled person (His workspace was immaculate, and every part of it was kanpeki).

Gary had some serious gear in his garage, and I was really impressed with the skill that one needs to get something machined to the right tolerances. Attention to detail is paramount.

Aluminum (Left), PVC (Middle), 3D printed PETG (Right)
The PVC machined part turned out great, and it will be used for the magnetic coupling assembly! I am really pleased with it.
During the 4th of July weekend, I had ordered a spool of PETG filament and printed another barrier to test whether or not PETG would have enough strength and durability to serve as a backup in case the PVC proved un-machinable. Some informal testing such as trying to pull it apart by twisting seems to prove that PETG really does have superior layer adhesion and strength compared to ABS and PLA (compared to my other prints). I think it would have served as a suitable candidate.
Here is Lenz’s law at work within the waterproof barrier (wobble is from loose fitment of bearing to inner coupling and will be stabilized by prop shaft supports).
Next Goals
Now that I have a robust waterproof barrier, I feel more at ease with the magnetic coupling design. I believe it should work OK for the duration of the trip. I also tweaked the inner portion of the magnetic coupling to include a 3d printed sleeve around the magnets in the event the epoxy failed during the voyage (hopefully minimizing failure).
There are a few things which need to take place before the launch however, now that LoCARB is in a state of dissassembly.
Ill need to:
- Assemble the magnetic coupling and propulsion system
- Re-Fiberglass the Rear of Locarb’s Motor Pod
- Calibrate Navigation (PID)
- Test Solar panel for damage
Test solar panel from damage?
During shelter in place, I had LoCARB charging by solar panel and extension wiring which led to my backyard (and another solar panel). My wife accidentally tripped on the wires and the wires unplugged from LoCARB, she then proceeded to reconnect the wires, but instead of connecting the wires from the backyard solar panel to the battery leads, she connected them to the leads of the solar panel mounted to Locarb. I don’t know if damage was done to the panel as I haven’t tested it yet, but I did remember smelling a burning smell. I need to do that once everything is put back together, but its not that difficult to replace and I can always order another panel easily.
Launch Date
The timing of the shelter in place orders from April to June slowed the rate of infection in the SF Bay Area but also delayed any further testing, calibration, and thus the launch of LoCARB. Figuring out the voyage duration at 2 knots, the trip to Hawaii would take ~43 days barring any negative currents or unforeseen weather incidents. If I wanted a round-trip back to San Francisco/Half Moon Bay, the entire trip would take about 3 months. Keeping weather in mind, the Pacific ocean has a dry season which starts ~May and ends ~October – this would be my launch window. If I was to get LoCARB ready by end of July, I may be able to launch and have it return by October. This is unlikely as I also need to build a deck for the she-shed, and as such, I am leaning more towards launching in 2021.
One thought on “Set to launch, then covid happened…”