Motor pod repaired
Its been a few months since the last update, but it wasn’t for lack of things to do! Side projects, vaccinations, and locarbftw.com was hacked, but I was able to finish assembling the motor pod so I can finally get the boat back into the water for more testing!
Side Projects
As much as Id like to just work on LoCARB, there are other pressing projects that urgently present themselves and take time away from this project. The most pressing of the sort was the rabbit cage that I needed to customize to automatically open and close while we were away on vacation, reducing the times people would have to come to our home to take care of our bunnies. Instead of a whopping 30 times over the course of 2 weeks, its now down to 4! What started as a simple idea turned out to be more than that, and turned out to be nearly double the amount of programming that went into LoCARB! Its actually quite a feat to behold as everything is done via web gui and the cage is constantly actuating based on updated sunrise/sunset times or light brightness values.

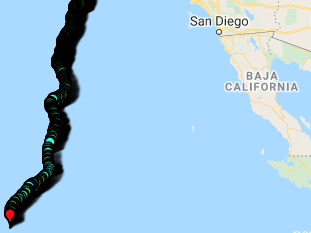
When I was checking google maps recently, I noticed that the map satellite captured my testing of the first version of LoCARBs power and propulsion system from May 2019! How cool is that!
Locarbftw.com hacked!
On March 25th to April 1st, www.locarbftw.com was redirecting visitors to a weird URL when any link was clicked. I finally realized this was happening when I saw web traffic drop off and went to investigate. It turned out to be a hacked plugin which was then updated automatically on my site. The plugin has since been deleted and site scanned and secured. Sorry about that!
On to the motor pod assembly!
Now onto the boat motor pod assembly…After building this out, I realized I really should have done this in the beginning. Its easy to say this in hindsight however, as the skills I picked up building the boat really greased the wheels for me to complete this portion of the project. 3D printing and improved electronics skills really allowed this portion to go much more smoothly than I thought it would.

LoCARBs new motor pod, a 4″ ABS Pipe with ABS printed endcap with 100% infill.

Side view of the ABS printed PVC strut support. These supports are to stabilize the rotational forces which the struts will encounter with the motor pod attached.

Top view of Strut Support.

After I removed the plastic case from the Victron BlueSolar MPPT charge controller, it fit PERFECTLY. I mean there was literally no real play sliding the unit inside. WHEW!

Test fitting all the stuff that needs to fit inside the tube.

Diagram of motor pod guts. Squiggly lines are wires, 5LB portions are scuba weights for ballast

More test fitting. Notice the newly fiber-glassed portions surrounding the boat struts.

Inside the pod are 3d printed dividers which keep the battery from moving around. I also used the front divider to attach the water level sensor (which you can see above).

Everything fits! However, when installing the struts I pushed too hard and it broke past the lips I added to keep the struts and supports at the same height. The action of the cement cured too fast and I ended up with struts 2″ shorter than I would have liked. Oh well.

Ends sealed (Need to do one side a day as I wanted to have the ABS Cement air out as much as possible prior to sealing the pod up). I learned that those fumes have strange side effects sometimes. Also notice the 3d printed nose cone.

Fiber-glassed

Added a 3d printed rear cone printed in vase mode (its flimsy, but prints fast and is good enough).

Another look at the 3d printed rear cone.

The beauty of fiberglass is its ability to contour around curves.

Fiber-glassing done. Notice the blue tape which I used to seal any gaps between the rear cone and motor pod.

I didn’t get any pictures of the sanding, but that’s what I did next. It took a few messy dusty hours. Use a respirator! Afterwards, I cleaned, taped off the area and started the first of 2 coats of marine paint.


Painting complete.
Some construction notes
- Additional fiber glass was applied to the areas where the struts connect to the strut supports as these areas need to be strong and resist any torque or movement of any kind. If a crack were to develop in these areas, it would be highly likely that a leak would result which would fill the motor pod with water.
- Both the front and rear cone areas were kept hollow in case more ballast needed to be added to balance out the boat. It would be easy to do so by drilling a few holes and filling with lead pellets or BBs, or just allowing the cavity to be filled with water.
- Prior to mounting and installing the motor pod, I needed to find the weight of all items that would be put inside the pod. I then needed to test the amount of additional ballast that would need to be added to make the pod negatively buoyant. I found that I needed an additional 12-15lbs, the pod and additional components only weighed 8lbs (for a target total of 20-25lbs).
Whats next?
- Secure propeller to propeller shaft
- Test and verify navigation
- Dial in power usage and thrust to acceptable levels while the boat is moving forward
- Tweak boat balance and buoyancy.
- Launch…again.